
This is a tutorial on how to install Kubuntu (Ubuntu with the KDE desktop) on an Acer Aspire V 17 Nitro Notebook VN7-793G Black Edition laptop. The laptop is a top of the range gaming laptop, but dressed with decorum in a very stylish businesslike black case so could feasibly used at client sites without raising any eyebrows. The laptop comes pre-installed with Windows 10 - hardly my favourite operating system, but I do on occasion have a need to use it when using some legacy apps. So Kubuntu will need to co-exist with Windows 10.
I have opted for the LTS (Long Term Support) version of Kubuntu which can be downloaded in iso format from here. I chose the 64bit 16.04 version of Ubuntu which weighed in at 1.5GB. The downloaded iso file needs to be copied over to a USB stick. I've tried the dd command method in the past in the Mac OS terminal and I've never had any joy with it. So my preferred method of creating a bootable USB stick is to use the Rufus Windows utility. We are ready for the installation but before we do that, we need to consider the composition of our dual operating system hard drives.
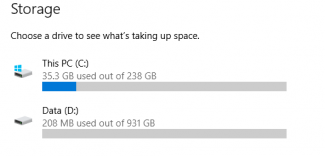
The Aspire V17 Nirto comes with two hard disk drives: a 256GB SSD drive for the Operating System and a 1TB SATA drive for user data. This is configured as shown above. Since I want to retain Windows and have a dual boot laptop, I need a solution where both Windows and Kubuntu can coexist on the ultra fast SSD and the user data can be shared on the SATA drive.
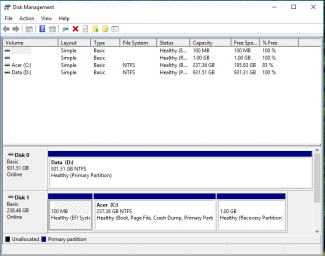
Navigate on the Windows 10 settings screen to the Disk Management utility. You will see the disk drive information as shown above.
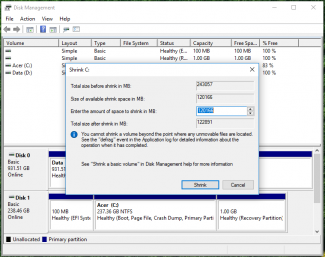
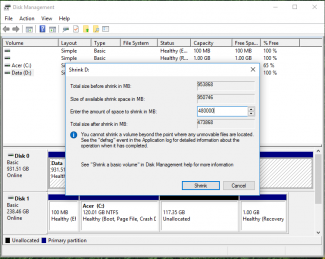
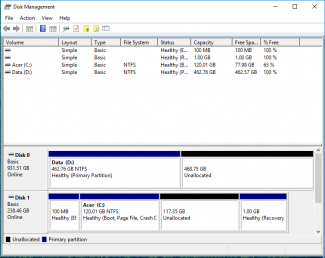
The disk utility in Windows allows us the opportunity to shrink existing utilities. So I elected to half the partition space between both the OS and the Data drives. The suggested shrink size which the utility provided was spot on 50% for the C: drive (see first picture above). The data drive wasn't so I rounded the size of the shrink to 48000 bytes (see second picture). Once both partitions were shrunk the net result can be seen in picture three.
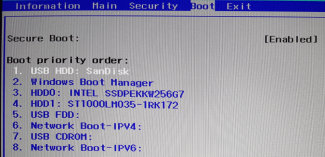
Put the bootable USB Stick with the Kubuntu image into the laptop and reboot. When the reboot sequence reloads the machine, tap F2 to enter the BIOS. Navigate to the Boot Sequence and you'll see the USB somewhere in the priority list. Select it and repeatedly press F6 to move it to the top, then tap F10 and save.
When the laptop boots, hit enter to load Kubuntu. You will be presented with the screen above after a few moments. Click on Install Kubuntu.
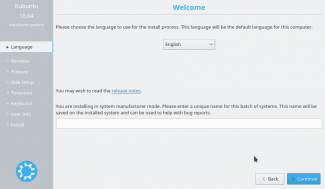
The installation wizard will launch and the Welcome screen will load. Click on Continue.
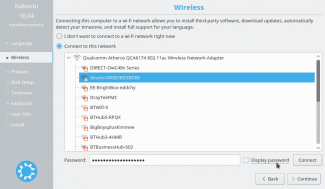
Set the language then click Continue and select your WiFi and add the password. Click Connect then click Continue.

The Prepare screen provides the opportunity to install 3rd party graphics and MP3 tools etc. I've ticked those since I want to use Kubuntu to play back media.
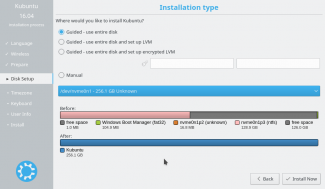
The next screen in the installation wizard is where the fun starts - setting up the partitions. Any false move here could mean curtains for the Windows bundled installation and therefore my desired dual boot. So tread carefully here! The wizard offers a guided partition scheme or it can be set up manually. The guided mechanism is actually quite dumb - it only wants to trash entire disk drives (and therefore Windows) - so don't use it! click the Manual radio button and then Continue.
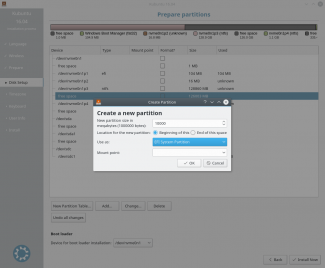
Once the manual screen is loaded, extend the modal so you can see all the partitions on the hard drives. We are going to need to set up four:
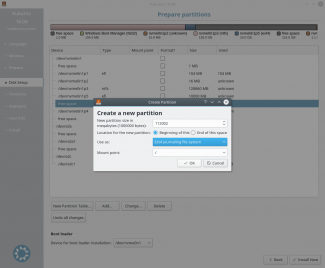
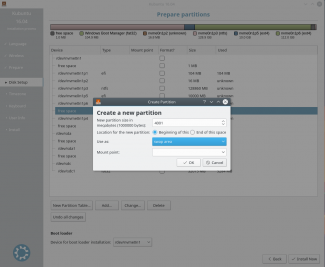
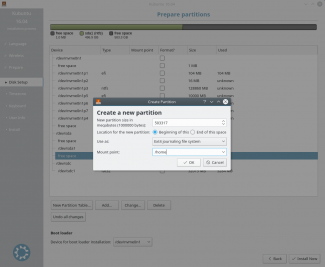
- EFI Partition on the SSD to hold the Grub Loader. This needs to be around 600MB or so; I rounded it up to 1GB
- Root Partition on the SSD for Ubuntu / KDE. I used the rest of the space remaining less 4GB for swap space (see below)
- Swap Partition of 4GB on the SSD
- User data partition on the SATA drive mounted at /home - half a terabyte.
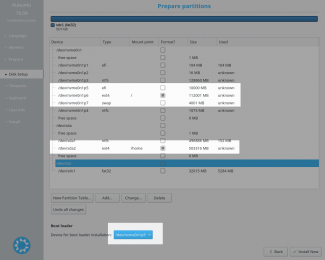
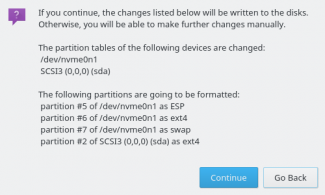
Once the partitions have been set up, you will see the list of partitions and that should match what you had visualised before you started this process. I have highlighted the new partitions. Note I have also set the boot location to the EFI partition I created - DON'T FORGET THIS! It isn't too late - YET - to change your mind or fix any problems. So inspect this list carefully and be sure you've got what you want. Click Install Now and the final confirmation screen appears listing the proposed changes. Double check this then click Continue if you are confident.

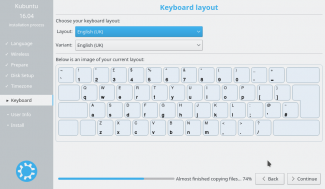
The next two screens in the wizard are self-explanatory - select the timezones and the keyboard settings.
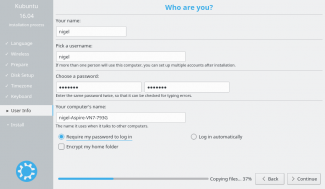
The final installation step is to create the user you will be logging in as. In addition set a suitable for the laptop.
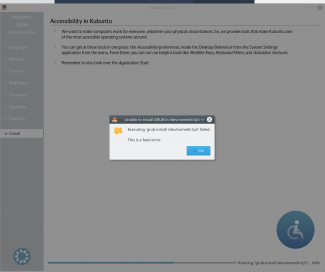
The installation should run to completion after the user information has been input. Unfortunately my installation failed in the final step - the point it writes the grub loader to the SSD drive. I'm unsure why this happened - perhaps it was because my BIOS was in Secure Boot mode - but if I'd rebooted my machine at this point I would've had a Kubuntu installation that couldn't be booted. So time to find a fix...
$ sudo apt-add-repository ppa:yannubuntu/boot-repair
$ sudo apt-get update
$ sudo apt-get install -y boot-repair
$ boot-repair
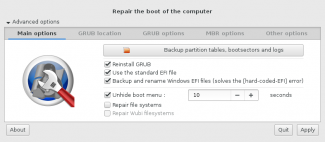
Boot successfully repaired.

You can now reboot your computer.
Please do not forget to make your BIOS boot on nvme0n1p5/EFI/ubuntu/shimx64.efi file!

You may want to retry after deactivating the [Backup and rename Windows EFI files] option.
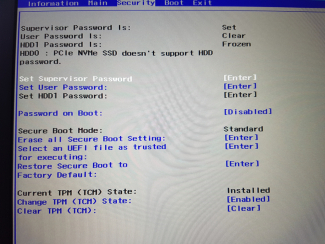
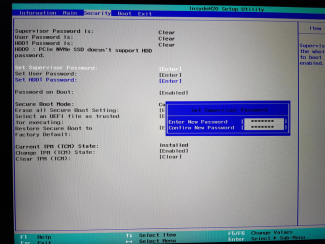
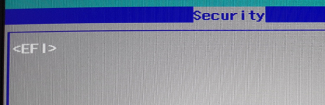
We now need to tell our system where it can find the Grub loader shim to boot Kubuntu. That menu option is under Security but is greyed out - to enable it you will have to set a Supervisor password.
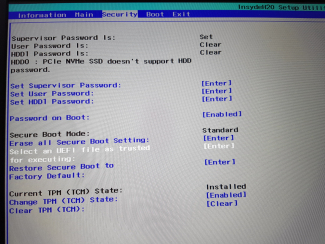
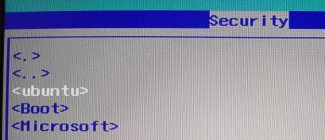
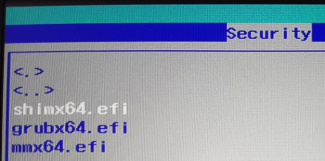

Now the option we want - Select an UEFI file as trusted for executing (1) is available in the menu options. Press enter and it's time now to traverse the filesystem until you find the correct file. At the top level you'll see UEFI (2). Then ubuntu (3). Then shimx64.efi (4). When you press enter you will be prompted to provide a name which will appear in the boot menu. I chose Kubuntu.
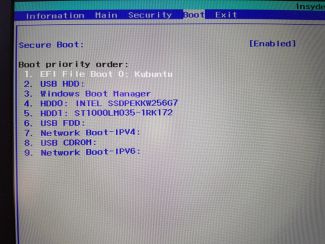
Now navigate to the Boot menu. At the bottom of the list you will see the entry you just added. Select it and hit F6 repeatedly to move it to the top of the list. Press F10 to save and exit. You may also want to remove the Supervisor password now your work is almost done. I didn't screenshot this - merely go back to the Security menu and change the password to nothing.
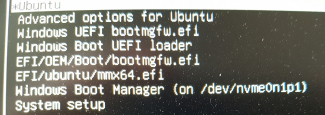
The laptop boots and we have the Grub shim menu system. Topmost and default is Kubuntu (although Grub can't distinguish it from Ubuntu of course) but I can also select Windows should I wish.
nigel@nigel-Aspire-VN7-793G:~$ df -kh | grep -v run
Filesystem      Size  Used Avail Use% Mounted on
udev            7.8G     0  7.8G   0% /dev
/dev/nvme0n1p6  103G  5.2G   93G   6% /
tmpfs           7.8G  140K  7.8G   1% /dev/shm
tmpfs           7.8G     0  7.8G   0% /sys/fs/cgroup
/dev/nvme0n1p5  9.4G  6.8M  9.3G   1% /boot/efi
/dev/sda2       462G  277M  438G   1% /home
nigel@nigel-Aspire-VN7-793G:~$