This blog shows you how to build a Squid proxy server on an inexpensive Raspberry Pi machine to help to test web application development in a local VM sandbox.
So here's the problem. Say you are using a VirtualBox hosting Linux in a MacBook to develop your web application. This is practically an industry standard these days; certainly in the open source world anyway. You will have defined the IP address allocated to your VM in your /etc/hosts along with the domain name you have chosen.
You have elected a 'browser first' strategy for the markup, but how do you test your website against hand held devices? Option 1 is using the simulator in Chrome and other browsers which do a very good job of emulating most common devices, but they aren't perfect and frequently the results will differ between the simulator and the physical device. But since it isn't possible to edit the /etc/hosts file in hand held devices, how do you point them to your arbitrarily named website domain? Well the second option is to use an external servicessuch as localtunnel that can expose an IP address to the Internet - but a local service must be running constantly on the VM and firewalls have to be configured to allow incoming http requests which is not always desirable.
There is a third way - use a proxy server to redirect the urls tapped into the hand held devices to the VM in your host machine (Mac / Windows or Linux). The easiest way to achieve this is to use Squid - a mature and free proxy server used throughout the IT industry. It has immense capabilities - such as blacklisting genres of websites (e.g. porn / sex sites) so young family members aren't exposed to what they shouldn't be. But we really only need simple redirection.
So my choice is Squid which runs on Linux. Should I buy even more new hardware for my apartment? Or repurpose equipment from my hardware junkyard in the spare bedroom? Nope. I've always wanted a Raspberry Pi to play with, and now I have an excuse to buy one!
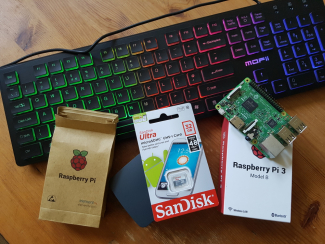
| Device | Raspberry Pi 3 Model B Quad Core CPU 1.2 GHz 1 GB RAM Motherboard |
Amazon.co.uk | £32.50 |
| SD Card | SanDisk Ultra 32 GB microSDHC Class 10 Memory Card up to 48 Mb/s - White/Grey | Amazon.co.uk | £13.50 |
| Box | Raspberry Pi 3 Case - Black/Grey | Amazon.co.uk | £5.50 |
| Keyboard | Mofii Full-size Colorful Wired USB LED Backlit Gaming Keyboard for PC & MAC - UK Layout | Amazon.co.uk | £12.99 |
| Power Cable | 2M / 6.5ft USB 2.0 A To MICRO B Cable Data and Charging Lead Cable - Black | eBay.co.uk | £1.65 |
| Wall Plug | DC5V 2A UK 3pin USB Charger Wall Plug Power Adapter | eBay.co.uk | £3.45 |
| Mouse | USB Mouse - spare | n/a | £- |
| Network Cable | RJ45 CAT5 cable - spare | n/a | £- |
| TOTAL | £68.80 |
So the total price was significantly less than buying a new desktop or laptop computer and obviously the USB keyboard can be reused on other projects. I could've reduced my exposure by sharing phone charging cables around my apartment rather than buy another one to be dedicated for the Raspberry Pi but I wanted a 5V 2A power supply so it made sense to spend a small amount of extra money.
There are plenty of tutorials on the Internet for setting up the base Raspberry Pi operation system - so I won't duplicate it here, but please note you will need to install the Raspberry Pi version of Debian Linux (Raspbian) on the SD card.
Here's a list of useful links:
Raspberry Pi Software Guide
How to set up and use a Raspberry Pi 3 with a Mac
SETTING WIFI UP VIA THE COMMAND LINE - Only needed if you are not going to use a static IP address through the LAN connection
Use Ssh to Talk With Your Raspberry Pi.
Once your Raspberry Pi is set up and you are ready to go, you can either ssh into the machine (as I did) or connect to it using a keyboard and mouse. If you choose SSH, you will have to enable that service first - see the link above if you are unsure how to do this.
pi@raspberrypi:~ $ sudo apt-get update
pi@raspberrypi:~ $ sudo apt-get upgrade
pi@raspberrypi:~ $ sudo apt-get dist-upgrade
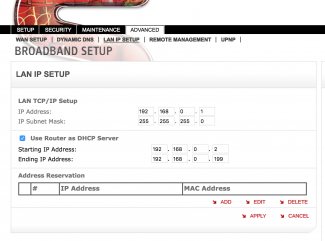
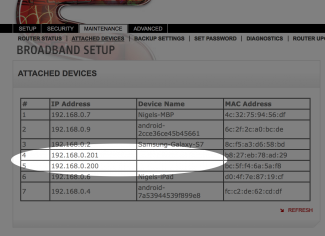
The Raspberry Pi 3 does come with WifI so theoretically it is possible to set it up to have a DHCP dynamically assigned IP address. However that would be saving up problems should the IP address change due to rebooting or power interruptions. It would mean a whole load of settings would need to be changed in our system each time that happens. Most routers come with a built-in DHCP server and the range of IP addresses can be set - see below. I have already set my range to be 192.168.0.2 to 192.168.0.199 so anything 200 and above is reserved for devices that need a static address.
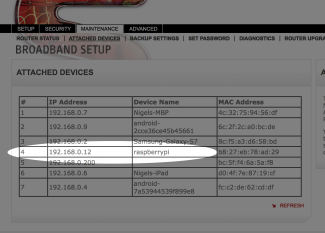
I now start up the Raspberry Pi, connected to my LAN with a RJ45 cable, and it gets allocated a dynamic IP address by the DHCP server on my router. This can be checked through the router UI (see below) or by issuing ifconfig when logged on to the Pi.
pi@raspberrypi:~ $ sudo su
root@raspberrypi:/home/pi# cd /etc/
root@raspberrypi:/etc# vi dhcpcd.conf
root@raspberrypi:/etc# tail -5 dhcpcd.conf

interface eth0
static ip_address=192.168.0.201/24
static routers=192.168.0.1
static domain_name_servers=90.207.238.97
root@raspberrypi:/etc#
root@raspberrypi:/etc# init 6
Connection to 192.168.0.12 closed by remote host.
Connection to 192.168.0.12 closed.
pi@raspberrypi:~ $ sudo apt-get install squid3
Reading package lists... Done
Building dependency tree
Reading state information... Done
The following extra packages will be installed:
  libecap2 libmnl0 libnetfilter-conntrack3 squid-langpack squid3-common
Suggested packages:
  squidclient squid-cgi squid-purge smbclient ufw winbindd
The following NEW packages will be installed:
  libecap2 libmnl0 libnetfilter-conntrack3 squid-langpack squid3 squid3-common
0 upgraded, 6 newly installed, 0 to remove and 0 not upgraded.
Need to get 2,370 kB of archives.
After this operation, 8,372 kB of additional disk space will be used.
Do you want to continue? [Y/n] Y
Get:1 http://mirrordirector.raspbian.org/raspbian/ jessie/main libmnl0 armhf 1.0.3-5 [10.9 kB]
Get:2 http://mirrordirector.raspbian.org/raspbian/ jessie/main libnetfilter-conntrack3 armhf 1.0.4-1 [40.0 kB]
Get:3 http://mirrordirector.raspbian.org/raspbian/ jessie/main squid-langpack all 20140506-1 [150 kB]
Get:4 http://mirrordirector.raspbian.org/raspbian/ jessie/main libecap2 armhf 0.2.0-3 [13.8 kB]
Get:5 http://mirrordirector.raspbian.org/raspbian/ jessie/main squid3-common all 3.4.8-6+deb8u4 [259 kB]
Get:6 http://mirrordirector.raspbian.org/raspbian/ jessie/main squid3 armhf 3.4.8-6+deb8u4 [1,897 kB]
Fetched 2,370 kB in 3s (634 kB/s)
Selecting previously unselected package libmnl0:armhf.
(Reading database ... 115447 files and directories currently installed.)
Preparing to unpack .../libmnl0_1.0.3-5_armhf.deb ...
Unpacking libmnl0:armhf (1.0.3-5) ...
Selecting previously unselected package libnetfilter-conntrack3:armhf.
Preparing to unpack .../libnetfilter-conntrack3_1.0.4-1_armhf.deb ...
Unpacking libnetfilter-conntrack3:armhf (1.0.4-1) ...
Selecting previously unselected package squid-langpack.
Preparing to unpack .../squid-langpack_20140506-1_all.deb ...
Unpacking squid-langpack (20140506-1) ...
Selecting previously unselected package libecap2.
Preparing to unpack .../libecap2_0.2.0-3_armhf.deb ...
Unpacking libecap2 (0.2.0-3) ...
Selecting previously unselected package squid3-common.
Preparing to unpack .../squid3-common_3.4.8-6+deb8u4_all.deb ...
Unpacking squid3-common (3.4.8-6+deb8u4) ...
Selecting previously unselected package squid3.
Preparing to unpack .../squid3_3.4.8-6+deb8u4_armhf.deb ...
Unpacking squid3 (3.4.8-6+deb8u4) ...
Processing triggers for man-db (2.7.5-1~bpo8+1) ...
Processing triggers for systemd (215-17+deb8u7) ...
Setting up libmnl0:armhf (1.0.3-5) ...
Setting up libnetfilter-conntrack3:armhf (1.0.4-1) ...
Setting up squid-langpack (20140506-1) ...
Setting up libecap2 (0.2.0-3) ...
Setting up squid3-common (3.4.8-6+deb8u4) ...
Setting up squid3 (3.4.8-6+deb8u4) ...
Creating Squid HTTP proxy 3.x spool directory structure
2017/07/30 18:55:00 kid1| Set Current Directory to /var/spool/squid3
2017/07/30 18:55:00 kid1| Creating missing swap directories
2017/07/30 18:55:00 kid1| No cache_dir stores are configured.
Processing triggers for libc-bin (2.19-18+deb8u10) ...
Processing triggers for systemd (215-17+deb8u7) ...
pi@raspberrypi:~ $
root@raspberrypi:~# cd /etc/squid3/
root@raspberrypi:/etc/squid3# cp squid.conf squid.conf.original
root@raspberrypi:/etc/squid3#
http_access allow all
acl localnet src 192.168.0.0/16 # RFC1918 possible internal network
cache deny all
root@raspberrypi:/etc/squid3# diff -Naur  squid.conf.original squid.conf
--- squid.conf.original	2017-09-02 19:22:23.804970154 +0000
+++ squid.conf	2017-09-03 10:41:48.190318779 +0000
@@ -1037,10 +1037,11 @@
 # should be allowed
 #acl localnet src 10.0.0.0/8	# RFC1918 possible internal network
 #acl localnet src 172.16.0.0/12	# RFC1918 possible internal network
-#acl localnet src 192.168.0.0/16	# RFC1918 possible internal network
+acl localnet src 192.168.0.0/16	# RFC1918 possible internal network
 #acl localnet src fc00::/7       # RFC 4193 local private network range
 #acl localnet src fe80::/10      # RFC 4291 link-local (directly plugged) machines

+
 acl SSL_ports port 443
 acl Safe_ports port 80		# http
 acl Safe_ports port 21		# ftp
@@ -1180,6 +1181,7 @@
 #Default:
 # Deny, unless rules exist in squid.conf.
 #
+http_access allow all

 #
 # Recommended minimum Access Permission configuration:
@@ -2999,6 +3001,9 @@
 # DISK CACHE OPTIONS
 # -----------------------------------------------------------------------------

+cache deny all
+
+
 #  TAG: cache_replacement_policy
 #	The cache replacement policy parameter determines which
 #	objects are evicted (replaced) when disk space is needed.
root@raspberrypi:/etc/squid3#
root@raspberrypi:/etc/squid3# service squid3 restart
root@raspberrypi:/etc/squid3#
root@raspberrypi:/etc/squid3# cp squid.conf squid.conf.local-vm
root@raspberrypi:/etc/squid3#
root@raspberrypi:/etc/squid3# cat /etc/hosts
127.0.0.1	localhost
::1		localhost ip6-localhost ip6-loopback
ff02::1		ip6-allnodes
ff02::2		ip6-allrouters

127.0.1.1	raspberrypi

192.168.0.14 badzilla-d8.localhost
192.168.0.14 meedjum.localhost
root@raspberrypi:/etc/squid3#
We are now ready to test our solution, and for this I'll use screenshots from Android and iOS.
Android
Go to Settings->WiFi, then long tap on your network and tap 'Modify network config', then tap 'Show advanced options' and add the configuration for the proxy, then tap save.
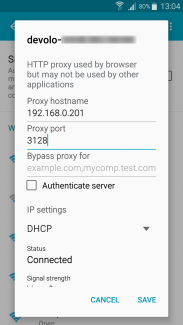
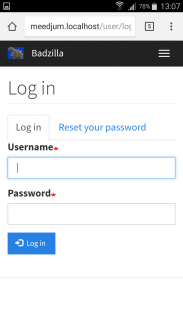
Now point a web browser to your web development domain
iOS
Go to settings, tap on your WiFi, tap on the information icon, tap on 'Manual' under HTTP Proxy, and enter the values.
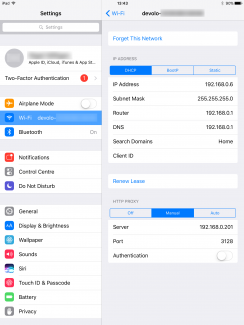
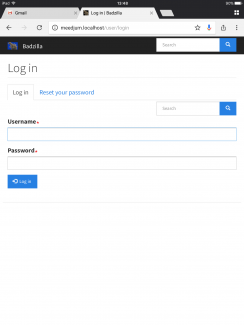
Now point a web browser to your web development domain - this is very early in the process as you can see. Somehow two seach boxes are on this early build!