
We are going to create a voting app to collect information from our users. This will require a HTML form to be initially rendered to the user using the HTTP GET method and then POSTed to the PHP backend for processing and the data saved into AWS DynamoDB. The page should then be redirected to a thank you page.
We shall call this app vote. So our first activity will be to refer back to my initial blog but instead of create a project demo, call it vote. Once you are ready check your function has been created correctly with the command below.
$ serverless invoke local -f vote
{
    "statusCode": 200,
    "body": "Go Serverless v1.0! Your function executed successfully!"
}
$
Ok - so we've reached base camp and we will now build on our sample function.
We will need the aws cli console to be able to upload our app's static assets (css, js, images) to S3 for them to be served by CloudFront. The console has a requirement for Python so that will need to be installed first if you don't already have it. If you already have Python installed, execute the command below.
# pip install awscli --ignore-installed six
$ npm install --save serverless-single-page-app-plugin
plugins:
  - serverless-single-page-app-plugin
resources:
  Resources:
    ## Specifying the S3 Bucket
    WebAppS3Bucket:
      Type: AWS::S3::Bucket
      Properties:
        AccessControl: PublicRead
        WebsiteConfiguration:
          IndexDocument: index.html
          ErrorDocument: index.html
    ## Specifying the policies to make sure all files inside the Bucket are avaialble to CloudFront
    WebAppS3BucketPolicy:
      Type: AWS::S3::BucketPolicy
      Properties:
        Bucket:
          Ref: WebAppS3Bucket
        PolicyDocument:
          Statement:
            - Sid: PublicReadGetObject
              Effect: Allow
              Principal: "*"
              Action:
              - s3:GetObject
              Resource:
                Fn::Join: [
                  "", [
                    "arn:aws:s3:::",
                    { "Ref": "WebAppS3Bucket" },
                    "/*"
                  ]
                ]
    ## Specifying the CloudFront Distribution to server your Web Application
    WebAppCloudFrontDistribution:
      Type: AWS::CloudFront::Distribution
      Properties:
        DistributionConfig:
          Origins:
            - DomainName:
                Fn::Join: [
                  "", [
                    { "Ref": "WebAppS3Bucket" },
                    ".s3.amazonaws.com"
                  ]
                ]
              ## An identifier for the origin which must be unique within the distribution
              Id: WebApp
              CustomOriginConfig:
                HTTPPort: 80
                HTTPSPort: 443
                OriginProtocolPolicy: https-only
              ## In case you want to restrict the bucket access use S3OriginConfig and remove CustomOriginConfig
              # S3OriginConfig:
              #   OriginAccessIdentity: origin-access-identity/cloudfront/E127EXAMPLE51Z
          Enabled: 'true'
          ## Uncomment the following section in case you are using a custom domain
          # Aliases:
          # - mysite.example.com
          DefaultRootObject: index.html
          ## Since the Single Page App is taking care of the routing we need to make sure ever path is served with index.html
          ## The only exception are files that actually exist e.h. app.js, reset.css
          CustomErrorResponses:
            - ErrorCode: 404
              ResponseCode: 200
              ResponsePagePath: /index.html
          DefaultCacheBehavior:
            AllowedMethods:
              - DELETE
              - GET
              - HEAD
              - OPTIONS
              - PATCH
              - POST
              - PUT
            ## The origin id defined above
            TargetOriginId: WebApp
            ## Defining if and how the QueryString and Cookies are forwarded to the origin which in this case is S3
            ForwardedValues:
              QueryString: 'false'
              Cookies:
                Forward: none
            ## The protocol that users can use to access the files in the origin. To allow HTTP use `allow-all`
            ViewerProtocolPolicy: redirect-to-https
          ## The certificate to use when viewers use HTTPS to request objects.
          ViewerCertificate:
            CloudFrontDefaultCertificate: 'true'
          ## Uncomment the following section in case you want to enable logging for CloudFront requests
          # Logging:
          #   IncludeCookies: 'false'
          #   Bucket: mylogs.s3.amazonaws.com
          #   Prefix: myprefix
  ## In order to print out the hosted domain via `serverless info` we need to define the DomainName output for CloudFormation
  Outputs:
    WebAppS3BucketOutput:
      Value:
        'Ref': WebAppS3Bucket
    WebAppCloudFrontDistributionOutput:
      Value:
'Fn::GetAtt': [ WebAppCloudFrontDistribution, DomainName ]$ env | grep AWS AWS_SECRET_ACCESS_KEY=XXXXXXXXXXXXXXXXXXXXXXX AWS_ACCESS_KEY_ID=XXXXXXXXXXXXXX $
$ sls deploy
Serverless: Packaging service...
Serverless: Excluding development dependencies...
Serverless: Uploading CloudFormation file to S3...
Serverless: Uploading artifacts...
Serverless: Uploading service .zip file to S3 (9.96 MB)...
Serverless: Validating template...
Serverless: Updating Stack...
Serverless: Checking Stack update progress...
...........................
Serverless: Stack update finished...
Service Information
service: vote
stage: dev
region: eu-west-1
stack: vote-dev
api keys:
  None
endpoints:
  GET - https://n4kofna4l1.execute-api.eu-west-1.amazonaws.com/dev/vote
functions:
  vote: vote-dev-vote
$
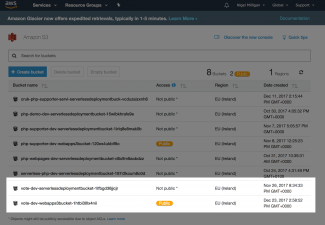
If we now navigate to S3 in the AWS console we should be able to see our two buckets for this project; one for the assets and one for our deployed serverless code.
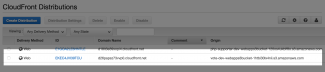
Now if we navigate to CloudFront we can see the service we have just created which will serve our S3 assets.
The plugin provides the serverless syncToS3 command which is run to perform the sync, but it requires configuration before we can use it. We need to set a custom variable s3LocalPath in the serverless.yml file.
$ cat serverless.yml | grep -A1 custom:
custom:
  s3LocalPath: dist/
$
$ mkdir -p dist/images
$ cp ../meedjum/docroot/themes/custom/beezee8/badzilla-logo32x32.png dist/images/.
$ sls syncToS3
Serverless: s3,sync,dist/,s3://vote-dev-webapps3bucket-1htbi30lx4nii/
upload: dist/images/badzilla-logo32x32.png to s3://vote-dev-webapps3bucket-1htbi30lx4nii/images/badzilla-logo32x32.png

Serverless: stderr undefined
Serverless: Successfully synced to the S3 bucket
$
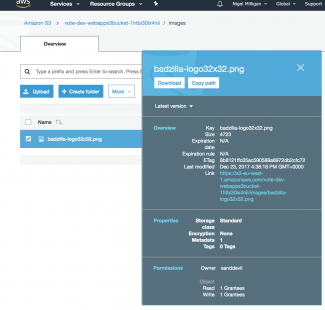
Navigate on the console to the S3 bucket, then through the filesystem and the images directory then click on badzilla-logo32x32.png. Looks Good.

Now if we point a web browser at your Bazilla logo asset we see that it is rendered correctly (look closely!). Yippee! We now have a working S3 / CloudFront configuration for our industrial strength Lambda function.