
These notes accompany my Bootable-openSUSE-Linux-11-2-64bit-on-a-USB-Memory-Stick article as a result of the numerous problems I encountered during its authoring. Hopefully this will save you some legwork.
There are three potential areas to investigate if you are having problems with your boot.
- Does your BIOS support the booting of an operating system off a memory stick?
- Can your memory stick actually boot?
- Is the image loaded onto the memory stick capable of booting?
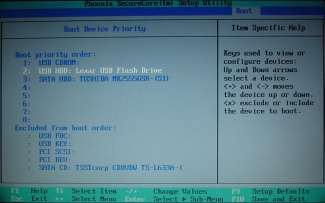
To check this you need to load the BIOS configuration when you switch on your computer. The keystroke required to do this varies. On my system I enter the BIOS with an F2 press, wait a few seconds and move to the 'Boot' option on the top menu. You can see that my BIOS is smart enough to recognise the Lexar drive as a hard disk device.
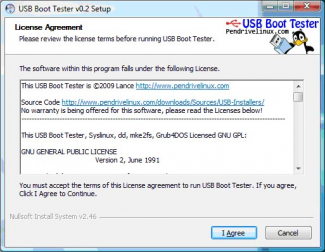
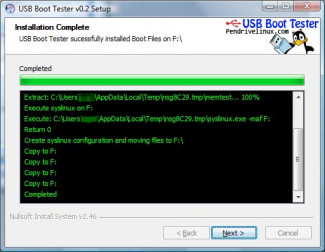
Next thing to check is whether your memory stick is capable of booting. This is certainly not a given - the whole engineering of USB sticks comes over as a black art and their quality can be best described as variable. The easiest way of checking your USB stick requires a working copy of Windows - so if you don't have access to this then you are struggling.
Download and install the utility USB Boot Tester from PendriveLinux Using this utility is straightforward - just follow your nose. The utility writes a memory test image to the memory stick (and obviously trashes anything aleady on the stick). Once this is completed, reboot your computer. If your memory stick is capable of booting, then the machine should boot into the USB Boot Tester memory test and your screen will look similar to that below.

This is where I had the most grief, but thankfully because I've gone through this you don't have to, and by following my instructions at Bootable-openSUSE-Linux-11-2-64bit-on-a-USB-Memory-Stick you should be ok.
If you stuff up the image file on your memory stick there is a simple way of trashing it. Issue the follow command, but be sure to change /dev/sdb to whatever device your memory stick is.
# dd if=/dev/zero of=/dev/sdb
This effectively writes null characters over the device to remove anything that already exists.
The following examples are the two trajectories I followed in the hope of getting a bootable USB memory stick. Neither worked.
The official instructions are here. They did not work for me, but I have reproduced the steps in case they do for you. Firstly, download the iso image file. I have gone for KDE and 64 bit.
$ cd /tmp
$ wget -q http://download.opensuse.org/distribution/11.2/iso/openSUSE-11.2-KDE4-LiveCD-x86_64.iso
$ wget -q http://download.opensuse.org/distribution/11.2/iso/openSUSE-11.2-KDE4-LiveCD-x86_64.iso.md5
$ md5sum openSUSE-11.2-KDE4-LiveCD-x86_64.iso > mout
$ diff  openSUSE-11.2-KDE4-LiveCD-x86_64.iso.md5 mout
$
$ ls -l /dev/disk/by-id/*usb*
lrwxrwxrwx 1 root root  9 2010-02-03 13:14 /dev/disk/by-id/usb-Lexar_USB_Flash_Drive_QR2EUZI4R8EFDFG39Y7T-0:0 -> ../../sdb
lrwxrwxrwx 1 root root 10 2010-02-03 13:14 /dev/disk/by-id/usb-Lexar_USB_Flash_Drive_QR2EUZI4R8EFDFG39Y7T-0:0-part1 -> ../../sdb1
# umount /dev/sdb1
# dd if=openSUSE-11.2-KDE4-LiveCD-x86_64.iso of=/dev/sdb bs=4M;sync
172+1 records in
172+1 records out
722468864 bytes (722 MB) copied, 62.0315 s, 11.6 MB/s
#
With a little surfing and a little knowledge, I came up with the following process which I thought stood a good chance. Firstly, get rid of the first attempt from the memory stick by reformatting.
# umount /dev/sdb1
# mkfs.vfat -F 32 /dev/sdb1
mkfs.vfat 2.11 (12 Mar 2005)
# cd /media
/media # mkdir suse-iso
/media # mount -o loop /tmp/openSUSE-11.2-KDE4-LiveCD-x86_64.iso suse-iso
/media # syslinux /dev/sdb1
/media # cd disk
/media/disk # cp -R /media/suse-iso/* .
/media/disk # cp -R boot/x86_64/loader/* .
/media/disk # mv isolinux.cfg syslinux.cfg
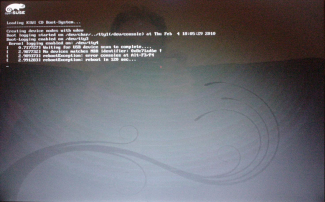
Now is the time to try a reboot. Initially it all looked promising (see left) but soon went astray as the boot sequence unfolded. It looks like the error message suggests that the image file has been corrupted which makes sense since I have copied those files to the root directory